Ok, part two.
Here I will tell you how to create a media center to play music CD's, DVD movies, photos, and movie files. I'll leave figuring out how to use remote controls, XBOX controllers, streaming web streams (including Realpayer streams), TV cards, and DVB cards up to you, the GeeXboX documentation, and the forum.
Neither i80and, mkbunday, or the MCGT Tribune takes any responsibility for any damage that occurs to a physical system or the data in it.
Contents:
1.0:
1.1: Find a computer & download
2.0:
2.1: Windows ISO Gen
2.2: Linux ISO Gen
3.0:
3.1: Install GeeXboX
3.2: Run GeeXboX
1.1.1: Ok, first find a computer. It has to support VESA 2.0 video standards, but other then that, go wild. I've tested the install on a PII 400mhz with a GeForce 2 400/MX and 128mb RAM. Back up any data you may want later on, and download GeeXboX at
http://www.geexbox.org. There are two ways to do this: The first option is to get a pre-made ISO to burn to a CD. This has pre-made settings that you may not want. To change these settings, download the
ISO Generator, and save to your hard disk.
If you are downloading the pre-prepared ISO, skip to part 3.
2.
2.1: First download
7-zip and then install it. Now, use it to extract the ISO generator. Now run
generator.exe.
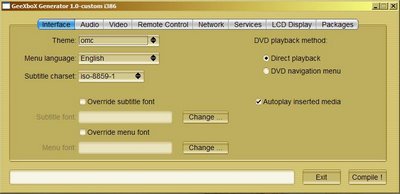
This is what you should get. The DVD playback mode is of interest. It allows you to change the default DVD mode. Direct Playback skips copyright notices and ads; directly to the movie. DVD navigation menu is what you may be used to. It's still beta in my tests (e.g. I haven't gotten it to work, but then it isn't designed for keyboards, either), but gives you more features and options.
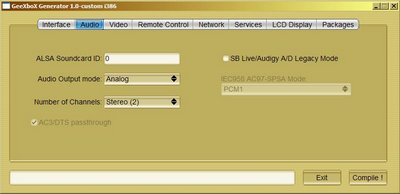
The audio tab sets certain audio feautes. If you have 5.1 surround sound, change the channel number to 5.1 surround.
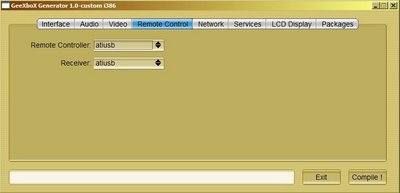
The remote control tab allows you to set your remote control driver. I haven't tested this, but atiusb (the default) controls a ATI All In Wonder.
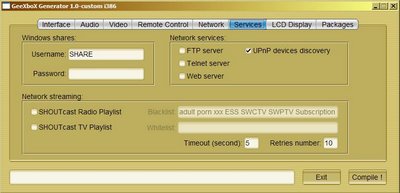
The services tab allows you to enable certain things. Windows Shares you can configure when you install GeeXboX, but the other options are of interest. I haven't tested any functions here, but the SHOUTcast check boxes help you stream radio and TV from the web. The server options I recommend leaving disabled, as my research into hacking shows that enabling a FTP server can be a huge security hole.
Packages allows you to enable Asian fonts, certain proprietary playback codacs, proprietary firmware for proprietary DVB cards and proprietary WiFi cards. Finally, you can install extra themes to set in the first tab.
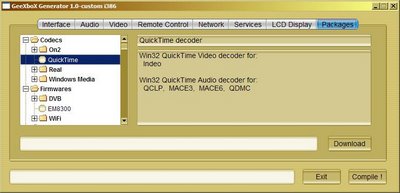
Now, if you have the CPU power, you may enable Post-Processing Effects to give smoother and higher quality playback. Browse to the archive directory, then browse to
 /iso/geexbox/etc/mplayer/mplayer.conf.
Right-click it, then hit
Open, or
Open With.
Open with Wordpad (notified won't work because it can't read the encoding).
Replace the lines
# Set Post Processing (h deblock, v deblock, dering, auto luminance)
# Consumes CPU power, disabled for low configs, uncomment to enable it.
#vf=pp=hb:a/vb:a/dr:a/al:a
with
# Set Post Processing (h deblock, v deblock, dering, auto luminance)
# Consumes CPU power, disabled for low configs, uncomment to enable it.
vf=pp=hb:a/vb:a/dr:a/al:a
Now just hit the
Compile button, and an ISO file will be created to the root directory of the generator directory as
geexbox-1.0-custom-en.i386.iso. Burn this
as an ISO using a tool such as Nero or Roxio, or CDBurnerXP.
Note: I have heard of a bug in the Windows version that may result in a corrupt ISO
2.2:
The only difference in Linux is that you don't need to download a new archive tool. Xarchiver I know works fine, but most if not all should work. Also, the generator program is called
Linux-i386-generator.
3.3.1:
Make sure that your BIOS is set to boot off of a CD-ROM. Change this by restarting your computer and hitting F1 (This changes between vendors. See your vendor documentation. Some BIOS may use escape or delete). There should be an option somewhere to set boot order. Change the order so that the CD drive boots before the hard disk.
Ok, so far so good. Now insert the GeeXboX CD, and exit BIOS
saving changes. As soon as the GeeXboX logo appears, hit F1. Then, the log should disappear (Or, you can make sure that your computer is supported by leaving it alone for 2 sec). Now type
install. GeeXboX will boot into the installer (ugly).
Step 1: GeeXboX will ask you where you want to install it.
hde is probably your hard disk. If this is where you want to install, hit enter.
Step 2: GeeXboX will tell you that you may now set up partitions. Hit enter. I won't tell you how to use
cfdisk, because it's the same as the DOS
fdisk. There are plenty of tutorials out there.
Step 3: GeeXboX will ask you which partition you wish to install to. Select with cursor keys, then hit enter.
Step 4: GeeXboX will as you if you want to reformat. Select with cursor keys, then hit enter.
Step 5: GeeXboX will ask you if you want to set up networking. Select with cursor keys, then hit enter. The defaults should work fine on most windows networks (if you know that your current network has a password, you will need to enter it).
Step 6: GeeXboX will now inform you if it found any other O/S installed, and if you want the bootloader (GRUB) installed into the MBR. I told it yes, but follow your inner nerd.
Step 7: That's it! GeeXboX will now reboot (unless you have a TV card. But I'll leave that one to you.)

Your computer will reboot. Take out the CD, and let GeeXboX boot. The interface, by the way, is on the top of the GeeXboX team's to-do list to revise, so don't be too harsh on it. When you insert a DVD or CD, the media will began playing automatically. To watch TV, view photos, sound clips, or video files, hit Open. Then, just follow your nerdy sense (with a little bit of trial-and-error, you can get it. But it may help to know that SAMBA is a Windows network). You may want to know these keys for the file manager, though (These are all in the Help menu, as well):
D: Set copy destination
C: Copy selected file to destination
Enter/Return: View or go into a directory (including ./)
P: Play all files in directory
R (then) O: Remove the currently selected file
Congratulations! No thanks to me you now have a media center! Yay!
Any wuestions? Just post them in the comments, and I'll make fun of you. I mean, answer them.


